Always in a constant pursuit of passive income, I have been following the crypto mining scene for some time now. I had dabbled with the idea of running some hardware miners or potentially building my own rigs and possibly building out a mining farm but, like many others, contending with the high costs and scarcity of GPUs in addition to power consumption issues became too much (and cost prohibitive). As an Ethereum fan, I became intrigued once again about minting my own crypto tokens upon learning about eth-docker and the shifting of Ethereum from Proof-of-Work (PoW) (think free-for-all race to be the first machine to validate) to a Proof-of-Stake (PoS) model (think loan your crypto, take a ticket, and stand in line). Proof-of-Stake lets you pony up your own Ethereum in exchange for the opportunity to be selected to validate Ethereum transactions, earning new Ethereum in the process. In this scenario eth-docker is the mechanism that lets us rapidly deploy Ethereum validator clients which, in-turn, are performing actual validation of Ethereum transactions.
Eth-docker is a git project maintained by Thorsten Behrens and his team of contributors on GitHub. Their efforts have made it super easy to deploy Ethereum validators in minutes via Docker containers and I tip my hat to them for their fine work in helping the rest of the Ethereum staking community out! As a long-time Linux fan and Docker user myself, this project was exactly what I had been looking for.
In this article ill break down the hardware and virtualization setup I used in combination with the eth-docker documentation already out there needed to get eth-docker up and running as a virtual machine so that you too can become part of the Ethereum blockchain and partaketh in a little piece of computing history as an Ethereum validator.
Becoming a validator is a major responsibility and requires a fairly high level of technical knowledge.
https://www.coinbase.com/learn/crypto-basics/what-is-proof-of-work-or-proof-of-stake
The Hard Side of Life.
The old saying “don’t put the cart before the horse” rears its ugly head. I was super excited to get right into the software configuration side of this Ethereum validator but before doing so, I needed to upgrade my physical server. I toyed around with a few different virtual machine designs (see ‘Setting up the Virtualization’ below) before finding a solution that hit the performance mark I was looking for, per eth-docker recommendations. To get eth-docker performing well enough to run as a production grade validator I needed to add an NVMe disk to my server. I already had an Intel SSD installed in my ESXi host but it was dedicated to serving as a VMFS datastore for all my running vm’s so that wasn’t an option. I started scouring the web for an adapter that would let me install an NVMe into the only spare server slot I had, a PCIe 16x slot.
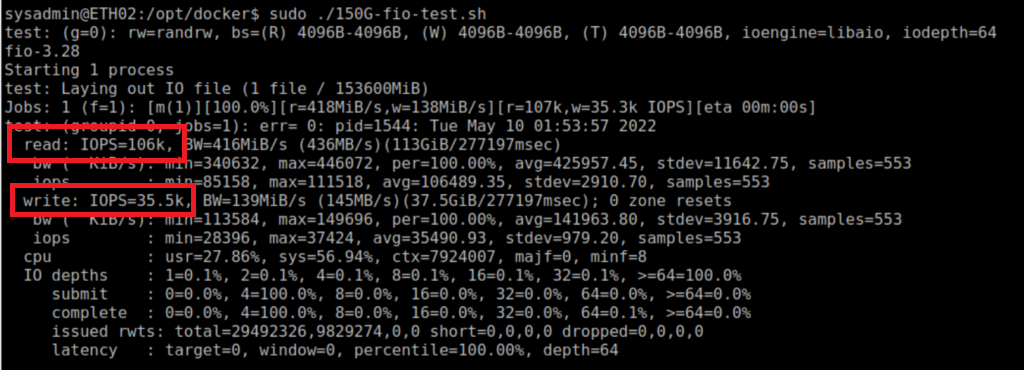
I eventually found a PCIe to NVMe adapter in the form of a RIITOP adapter. This adapter utilized all 16 lanes of the PCIe bus and so would be my best bet for running a PCIe-to-NVMe adapter. The eth-docker project highly recommended a 2TB disk for storing the eth blockchain data and so my NVMe of choice was a SAMSUNG 970 EVO Plus SSD 2TB – M.2 NVMe.
I was able to achieve an assumingly respectable read IOPS of 106K and write IOPS of 35.5k:
Check out the gallery below to get a feel for what my hardware looked like and how it came together.


Once the adapter was seated into my server and powered on it was time to setup the virtual machine that would become the host of the eth-docker software running inside Docker.
Setting up the Virtualization.
After a reboot of the server (Cisco UCS C220 M4) I proceeded to verify that the new adapter had been recognized by my VMware ESXi hypervisor (see section gallery). Checking the hardware tab of my host I was able to see a “Samsung Electronics Co NVMe Controller”, success was mine. I enabled passthrough mode of the adapter card and began the process of standing up a new vm. My design philosophy had undergone a few different iterations before landing on the design I’m running today (no spoilers). This visual shows the different phases of design I went through:
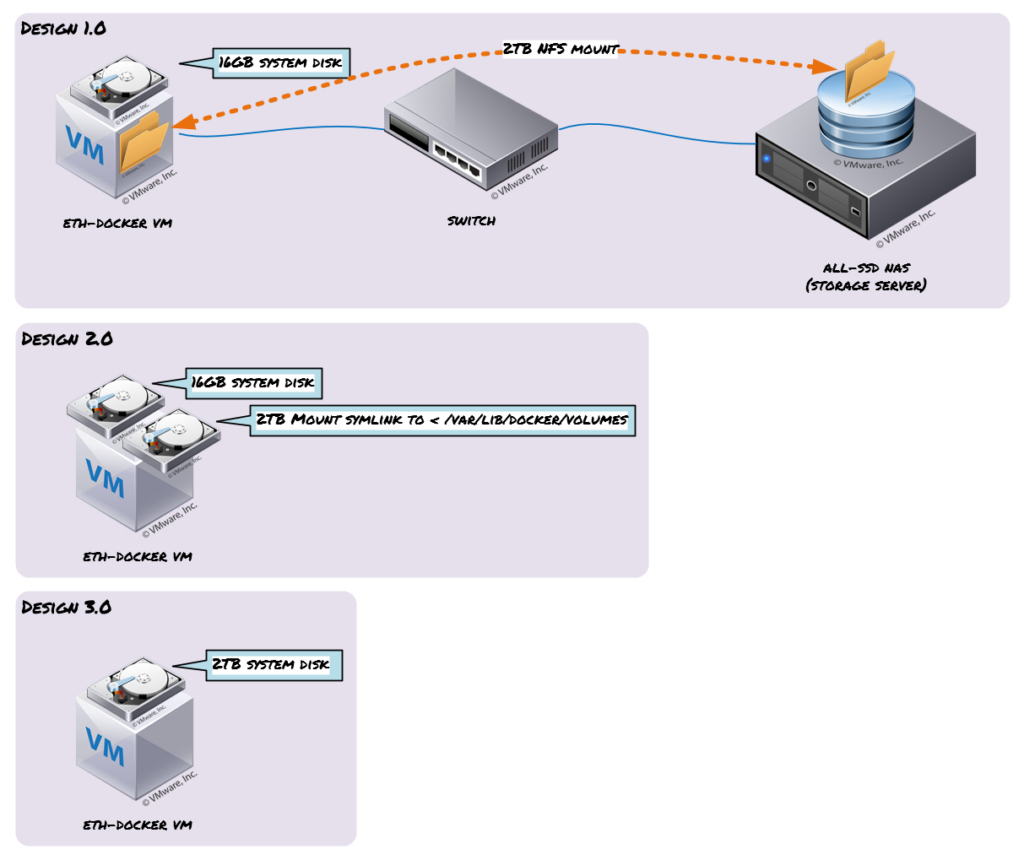
Design 1.0
My initial thoughts were to map an NFS share to my Ubuntu vm and store eth-docker data inside the NFS mount. My storage server (UnRAID) was an all SSD array and was fairly speedy but ultimately didn’t hit the performance metrics I was looking for (per eth-docker file IO recommendations).
Design 2
Moving on, I had decided to just add the passthrough NVMe disk to my Ubuntu vm as a secondary disk, installing Ubuntu to the primary 16Gb system disk. After tweaking Ubuntu to my liking I mounted the 2TB NVMe disk via fstab and decided to move all my /var/lib/docker/volumes to this new disk and adding a symlink from old volumes data to new volumes data. This proved to buggy and I didnt want to introduce any instability to my prized eth-docker validator.
Design 3.0
Winner winner chicken dinner! They say simple is always better right!? Installing Ubuntu directly to the passthrough NVMe disk was the way to go and ultimately the choice I made for a long-term running vm.
Check yo self…
A few important notes, I was only able to get the Ubuntu installer to see the attached passthrough NVMe disk after enabling EFI BIOS in my vm settings under the VM Options menu. The default BIOS wouldn’t detect the disk. Also I made sure to reserve all guest memory of my vm as a performance tweak so that my eth-docker vm wasn’t competing for any memory on my host. I didn’t see any need for a CPU reservation as I was barely utilizing any CPU on my host.


The Softer Side of Things.
With Ubuntu all squared away it was time to get eth-docker actually installed and running on the testnet network. Testnet lets you test your validator settings and that everything is functioning correctly before making the investment to stake on mainnet. I largely followed the polished documentation right off the project page: https://eth-docker.net/docs/About/Overview and taking the time to harden the vm with the ufw firewall, running the containers as a non-root user, enabling ssh-key only access, and placing the vm inside my network DMZ. The auto-updates and time sync call-outs were a pleasant surprise to see documented and features I took advantage of during my install.
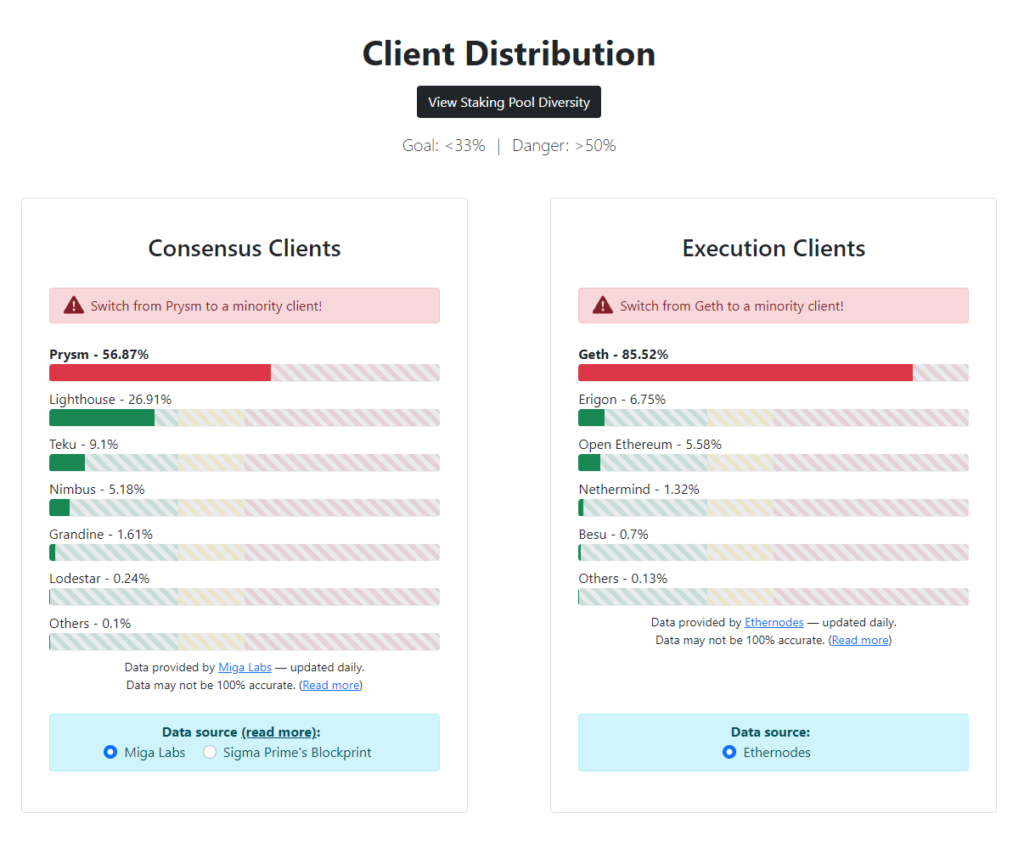
If your curious, I opted to run the Nimbus consensus and Nethermind execution clients, both minority clients, doing my part to prevent any one client from ‘ruling them all’ and owning the lions share of the client market, which we don’t want to see happen as prudent crypto stewards. See the visual below for the latest comparisons of client utilization.
After getting my eth-docker containers up and running I stumbled across this video which I had watched to glean any tidbits not contained on the projects website. Shout-out to ETHStaker for the how-to!
Switching it Up
Now that we have a proven validator setup and rocking on your hardware, its time to go all-in and start validating on the mainnet beaconchain and earn actually Ethereum rewards! Follow these steps to switch to mainnet from testnet:
- Stop and nuke your testnet containers
./ethd terminate - Update .env to mainnet
NETWORK=mainnet
EL_NETWORK=mainnet - Update everything (just to be sure your on the latest)
./ethd update - Re-build
./ethd cmd build --pull - Import keys (assuming in same location)
./ethd keyimport - Start client backup and sync
./ethd start - Deposit on Mainnet launchpad (ideally after initial syncing is completed)
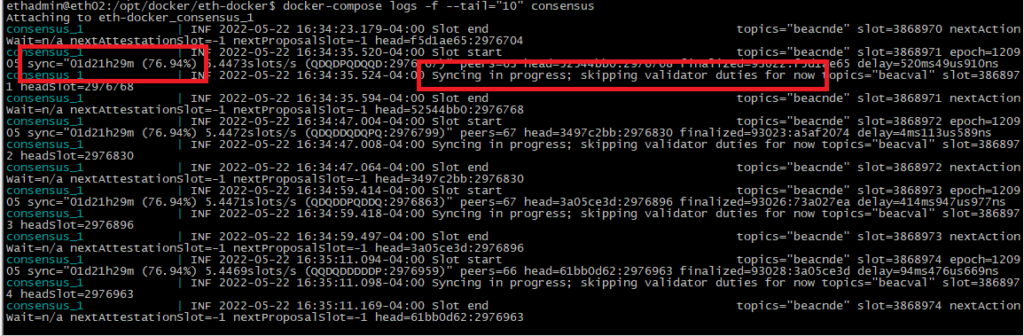
Lets Get in Sync
You can confirm the sync status of your eth-docker validator by running the following command:
Depositing on Mainnet
Depositing on mainnet means navigating to the main Ethereum launchpad, https://launchpad.ethereum.org/en/ and clicking the link to “Become a Validator”. After clicking through all the steps in the process you’ll eventually be asked how many validators you want to run. You will need to commit 32 of your own Ethereum to run a full validator. Next you’ll need to “Upload deposit data” by uploading the deposit_data-[timestamp].json file you had created while going through the eth-docker guide.
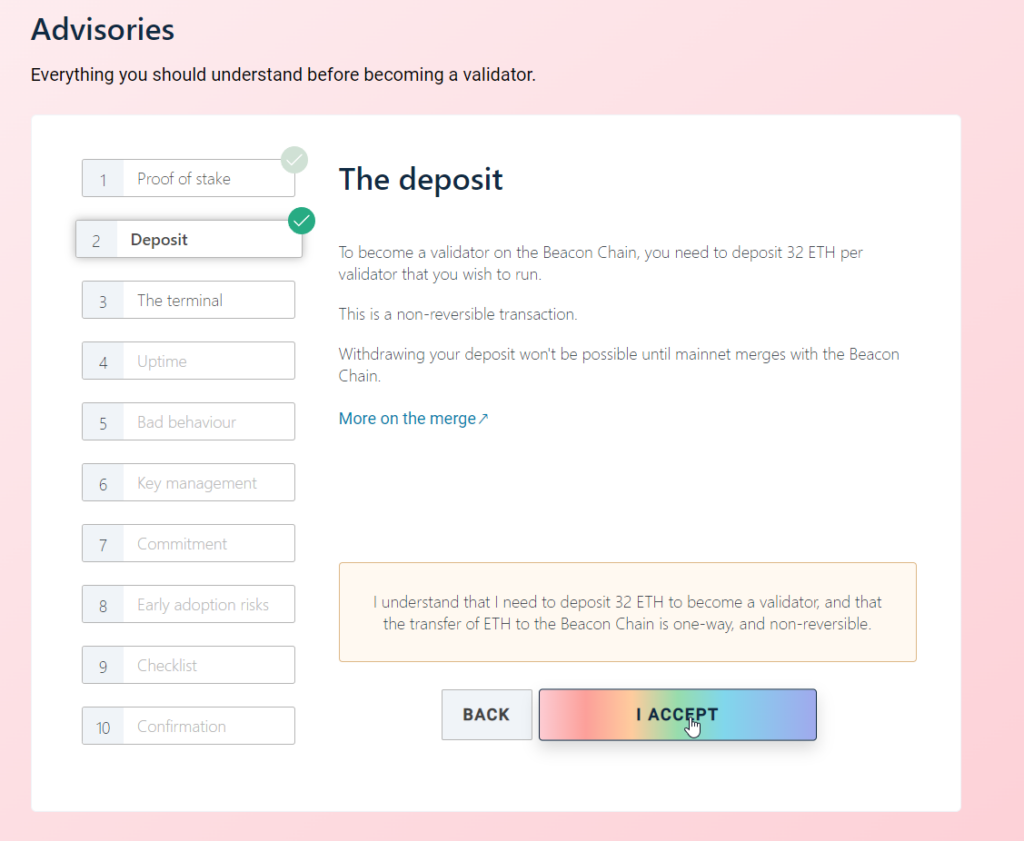
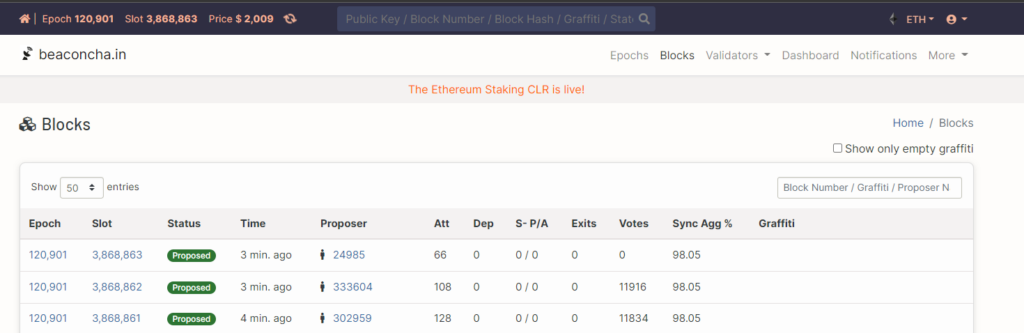
Depositing to mainnet beaconchain and getting your validator added to the list of active validators takes some time. After uploading your valid mainnet deposit_data file, depositing 32 ETH into the wallet you referenced in generating your deposit_data file, and submitting, it will very likely take several days before your validator becomes active. You can see the output below from my validator and I had summitted my data for validation a few days before taking this screenshot. So be prepared to wait it out.
Closing Arguments
Check out the real-time beacon chain network and do a search for your graffiti to see the blocks you took part in validating on the public Ethereum mainnet blockchain!
Now that’s just cool and I don’t care who you are. Contributing back to the de facto blockchain technology that is Ethereum in the form of running your own validator is an awesome feeling and a world good for the future state of a Decentralized Finance (DeFi) economy, something I believe in strongly.
If your looking for any help setting up your own eth-docker validator then hit up the ETHStaker boys on their discord channel, and of course you can always hit me up too 🙂 See the homepage of my (this) site for contact info.
2 Comments
Kelly Jubara · June 17, 2022 at 10:35 pm
I have been attempting to mine monero with older computers. How are you using your servers here? Are you making a number of VMs to mine?
Aaron · July 5, 2022 at 4:38 pm
Hey Kelly, I’m technically performing staking (PoS) which is much less resource intensive when compared to mining (PoW). With staking, I’m able to run a virtual ubuntu machine inside my ESXi server and run my validator, consensus, and execution client software inside docker as containers fairly easily. As far as I know, Monero still leverages PoW or traditional mining so probably not something I would be looking to do on my server unless I installed a dedicated discrete GPU and passed it through to the Monero mining vm but then again, probably not wanting to contend with the power usage there.